Picasa is Google's fast and easy photo sharing program. Google states, "Picasa & Picasa Web Albums make it easy for you to organize and edit your digital photos, then create online albums to share with friends, family & the world." The online program also provides you with plenty of storage and allows you to not only put your pictures on a safe server but also to share your images via email or online web pages. Picasa is also a great way to back up your pictures or to store pictures if you are low on storage space on your computer or your web server.
Creating A Photo SlideShow On Picasa
Below I will show you how you can use Picasa's embed slideshow to add a slideshow to display multiple pictures to your web page or blog via Picasa. If you do not know what an embed tag is take a look at my short previous post it will help you understand what you are about to do a little better.
Steps to making a web slideshow on Picasa:
Note: If you are familiar with Picasa skip to step 3.
1. First you will need a Google Account or Picasa account. Both are free and if you click on the links you can sign up. They will both give you access to Picasa. If you have a Google Gmail account then you already have an account. Just go to Picasa's web page and login with your same username and password as your Gmail account.
2. Upload your pictures to an album. You can use Picasa's online uploading program or install Picasa on your computer to do this. If you install the program be sure to look for the button that says upload your pictures online. I also suggest you watch the videos below so you can get a better understanding of how Picassa works.
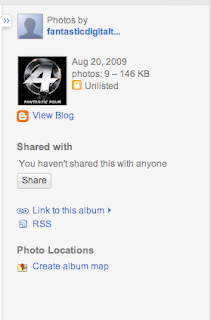
3. Once your pictures are uploaded go to your online album on the right side click on the
4. Then click on the  Embed Slideshow. This tag will allow you to create your slideshow.
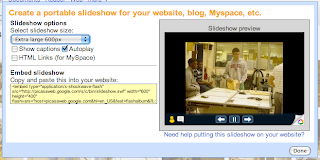
5. A new window will open that will ask
you how you would like your slideshow to appear once you post it. You will need to chose the size and what you would like to include in your slide show like captions and links.
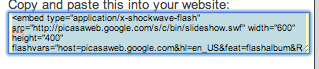
6. Next copy the embed tag by going to Edit copy on your browser or use the short cut key Control C
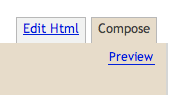
7. Paste the embed tag into your blog or webpage HTML. On Blogger you will need to go to the Edit HTML section of your post to paste it. In Dreamweaver you will do the same thing add the code to your HTML area.
8. Upload your webpage or publish your blog post and you've got yourself a very fancy slideshow embed in your page.
Picasa Introduction Videos
Click on the arrows to move to the next video on my playlist.
No comments:
Post a Comment